Hey guys welcome back to the second part of “How to create your own Single Page Application Autoresponder with Rails 4 and Angular.js”.
In this second part, some of the content we are going to talk about includes:
- Taking a look on how to organize our files in Angular applications, basically I’m going to talk a little bit about the standard structure and the one that is organized by features/components which is the one that we’ll use for these tutorials.
- We are going to setup the structure of our backend(API), where we are choosing a namespace called “/api/{{version}}/”.
- And the most important goal to achieve here is about how to manage our email lists.
Let’s get started:
Let’s start coding the backend: controllers, endpoints, routes and so forth.
The first thing we’ll need to do is to define a namespace:
So, we have to open up our config/routes.rb file and include the namespace for our API; in my case, I’m going to call it api and I’ll define the email_lists controller routes as well:
# config/routes.rb
Rails.application.routes.draw do
  root 'users#index'

  constraints do
    namespace :api, path: '/api' do
      namespace :v1 do
         resources :email_lists
      end
    end
  end
end
NOTE: Don’t forget to restart your server after making changes to your routes.
Creating a model for managing email subscribers lists:
rails g model EmailList name default_from default_from_name remind_people_message:text company_organization address city country state_province phone secure_key thank_you_page_url alread_subscribed_url
Create associations between email_lists and users:
# app/models/user.rb
has_many :email_lists

# app/models/email_list.rb
belongs_to :user
We’d want to validate some attributes for email_list model:
  validate :name,
           :user_id,
           :default_from,
           :default_from_name, presence: true
We need to generate an unique attribute for secure_key, we’ll use this key for different operations in which we don’t want people to be able to predict this value from our email list. Here’s how the generate_secure_key method. It would look like this:
# app/models/email_list.rb
  after_create :generate_secure_key

  private

    def generate_secure_key
      self.update_column(:secure_key, SecureRandom.uuid)
    end
Now, it’s time for creating the folders and email_lists controller, we just need to run the commands bellow in “terminal”:
mkdir -p app/controllers/api/v1/
touch app/controllers/api/v1/email_lists_controller.rb
Let’s use some inheritance and create a parent controller where we are going to put the common logic for controllers, we’d call it “base_controller”:
touch app/controllers/api/base_controller.rb
Before moving on to base_controller, let me explain what we are going to do there:
For this project we are going to use MultiJson because it seems that in Rails render json: obj is slower than calling MultiJSON.dump ourselves, anyway we are using a MultiJson gem.
As I said in the introduction, we are using ActiveRecord Serializers.
So let’s put the common methods in our parent base controller:
# app/controllers/api/base_controller.rb
class Api::BaseController < ActionController::Base

  before_filter :authenticate_user!, :except => [:add_public_subscriber]

  rescue_from ActiveRecord::RecordNotFound, with: :activerecord_not_found

  def render_serialized(obj, serializer, opts={})
    render_json_dump(serialize_data(obj, serializer, opts))
  end

  def render_json_dump(obj, status = :ok)
    render json: MultiJson.dump(obj),
           status: status
  end

  def render_json_message(message, variable = 'status')
    data = {
      "#{variable}" => message
    }
    render_json_dump(data, :ok)
  end

  def render_error_object(hash)
    render_json_dump(hash, :unprocessable_entity)
  end

  def render_with_error(msg = 'An error occurred while...')
    data = {
      error: msg
    }
    render_json_dump(data, :unprocessable_entity)
  end

  def activerecord_not_found
    data = {
      error: 'Record not found'
    }
    render_json_dump(data, 404)
  end

  def serialize_data(obj, serializer, opts={})
    # If it's an array, apply the serializer as an each_serializer to the elements
    if obj.respond_to?(:to_ary)
      opts[:each_serializer] = serializer
      ActiveModel::ArraySerializer.new(obj.to_ary, opts).as_json
    else
      serializer.new(obj, opts).as_json
    end
  end
end
Remember to add the multi_json gem in your Gemfile:
gem 'multi_json'
Update dependencies
bundle install
And finally, the email_lists controller looks like a regular CRUD controller:
# app/controllers/api/v1/email_lists_controller.rb
class Api::V1::EmailListsController < Api::BaseController

  def index
    email_lists = current_user.email_lists.order('created_at DESC')
    render_serialized(email_lists, EmailListSerializer, root: false)
  end

  def create
    email_list = current_user.email_lists.create(email_list_params)

    if email_list.valid?
      render_serialized(email_list, EmailListSerializer, root: false)
    else
      render_error_object(email_list.errors.messages)
    end
  end

  def show
    email_list = current_user.email_lists.find(params[:id])
    render_serialized(email_list, EmailListSerializer, root: false)
  end

  def update
    email_list = current_user.email_lists.find(params[:id])

    if email_list.update(email_list_params)
      render_serialized(email_list, EmailListSerializer, root: false)
    else
      render_error_object(email_list.errors.messages)
    end
  end

  def destroy
    email_list = current_user.email_lists.find(params[:id])

    if email_list.destroy
      render_json_message('Email list was deleted successfully')
    else
      render_with_error('An error occured while deleting the email list')
    end
  end

  private

    def email_list_params
      params.require(:email_lists)
            .permit(
              :name,
              :default_from,
              :default_from_name,
              :remind_people_message,
              :company_organization,
              :city,
              :country,
              :state_province,
              :phone,
              :address
            )
    end
end
As you see, we are using our first Serializer, before creating it, we need to add the activerecord_serializer gem to our Gemfile:
gem 'active_model_serializers'
# bundle install
Now the EmailListSerializer includes a pretty straighforward code:
# app/serializers/email_list_serializer.rb
class EmailListSerializer < ActiveModel::Serializer
  attributes :name,
             :default_from,
             :default_from_name,
             :remind_people_message,
             :company_organization,
             :city,
             :country,
             :state_province,
             :phone,
             :created_at,
             :address,
             :secure_key,
             :thank_you_page_url,
             :already_subscribed_url,
             :id
end
Before moving on, let’s check out if the endpoint is responding correctly, in order to do that we need to create a new EmailList from console:
# if you already created a new account(signup form) database should have at least one user.
last_user = User.last
EmailList.create({name: 'first list created', user_id: last_user.id})
After creating that new email list, if you visit the following url:
http://localhost:3000/api/v1/email_lists.json
You should see a json reponse including the email list that you just created.
Angular Frontend
Now it is time to create the required Angular frontend code to get the email lists working properly:
Standard structure
I’ve seen in many tutorials that use this kind of organization for files; at first glance, seems to make a lot of sense and it is very similar to many MVC frameworks. We have diverse responsabilities and concerns, models have their own folder, views have their own folder, controllers have their own folder, and so on.
It is recommended to follow this directory structure for small applications, small tutorials, but once you start having more than 10 controllers you’re going to make lot of scrolling.
If you want to organize your files using that folder structure, you can look at this commit where I was organizing the folders that way. The angular js files for another tutorial:
https://github.com/heridev/start_with_rails_angular/commit/14b28448c8e456907738134d7d2f2d91e5924ee7
Structure folder based on components
For this ocassion, we are going to organize our Autoresponder based on specific features or sections. Take a look at a sample directory structure below:

If you want to organizate it the same way as me, you only need to create a folder called “components” inside our namespace called autoresponder and add this line in the application.js:
# app/assets/javascript/application.js
//= require_tree ./autoresponder/components
and in terminal
mkdir app/assets/javascripts/autoresponder/components
As I said, we are grouping angular files like templates, services, controllers, directives based on features and now, it is time to implement email list management for that we’d create a folder called email_lists inside components where we are going to put all the classes, directives, templates, services, controllers, etc.
Using terminal:
mkdir app/assets/javascripts/autoresponder/components/email_lists
We can start declaring the new routes that we’ll use for emails list management. To do that, we have to add them into the state.js file:
# app/assets/javascripts/autoresponder/components/email_lists/details/signup_forms/replaceTextAreaDirective.js
        .state("email_list", {
          url: "/email_list",
          // using nested routes
          abstract: true,
          controller: 'emailListCtrl',
          templateUrl: 'autoresponder/components/email_lists/main.html',
        })

        .state("email_list.list", {
          url: "",
          controller: 'emailListCtrl',
          templateUrl: 'autoresponder/components/email_lists/index.html',
        })

        .state("email_list.add", {
          url: "/add",
          controller: 'emailListAddCtrl',
          templateUrl: 'autoresponder/components/email_lists/add.html',
        })
Those routes will generate the following available links:
#/email_list => shows all the email lists
#/email_list/add => creates a new email list
Notice that I’m using nested routes with state provider so that way we can use some inheritance from the parent, use specific styles for all those templates and so on.
Creating our first angular controller:
When working with Angular, I’d rather use plain javascript than coffescript, but if you want to use coffescript or typescript is up to you.
This is how my emailListCtrl.js looks, which is handling the email listing:
# app/assets/javascripts/autoresponder/components/email_lists/emailListCtrl.js
AutoresponderApp
  .controller('emailListCtrl', [
    '$scope',
    'EmailListService',
    function (
      $scope,
      EmailListService
    ) {

      var loadEmailLists = function() {
        return EmailListService.findAll().then(function(email_list) {
          $scope.email_list = email_list;
        });
      };

      loadEmailLists();
    }
  ])
Notice that we are using a service called EmailListService which is the reponsible to handle all http requests for email list and it is using Restangular instead of the regular $http Angular service.
The EmailListService looks as follows:
# app/assets/javascripts/autoresponder/components/email_lists/emailListService.js
AutoresponderApp
  .factory('EmailListService', ['Restangular',
                            function(
                              Restangular
                            ) {
    var model;

    model = 'api/v1/email_lists';

    return {
      findAll: function(params) {
        return Restangular.all(model).getList(params);
      }
    };
  }
]);
In my case, the main template for email_lists is going to look like this:
# app/assets/javascripts/autoresponder/components/email_lists/main.html.haml
.main-email-list
  %ui-view
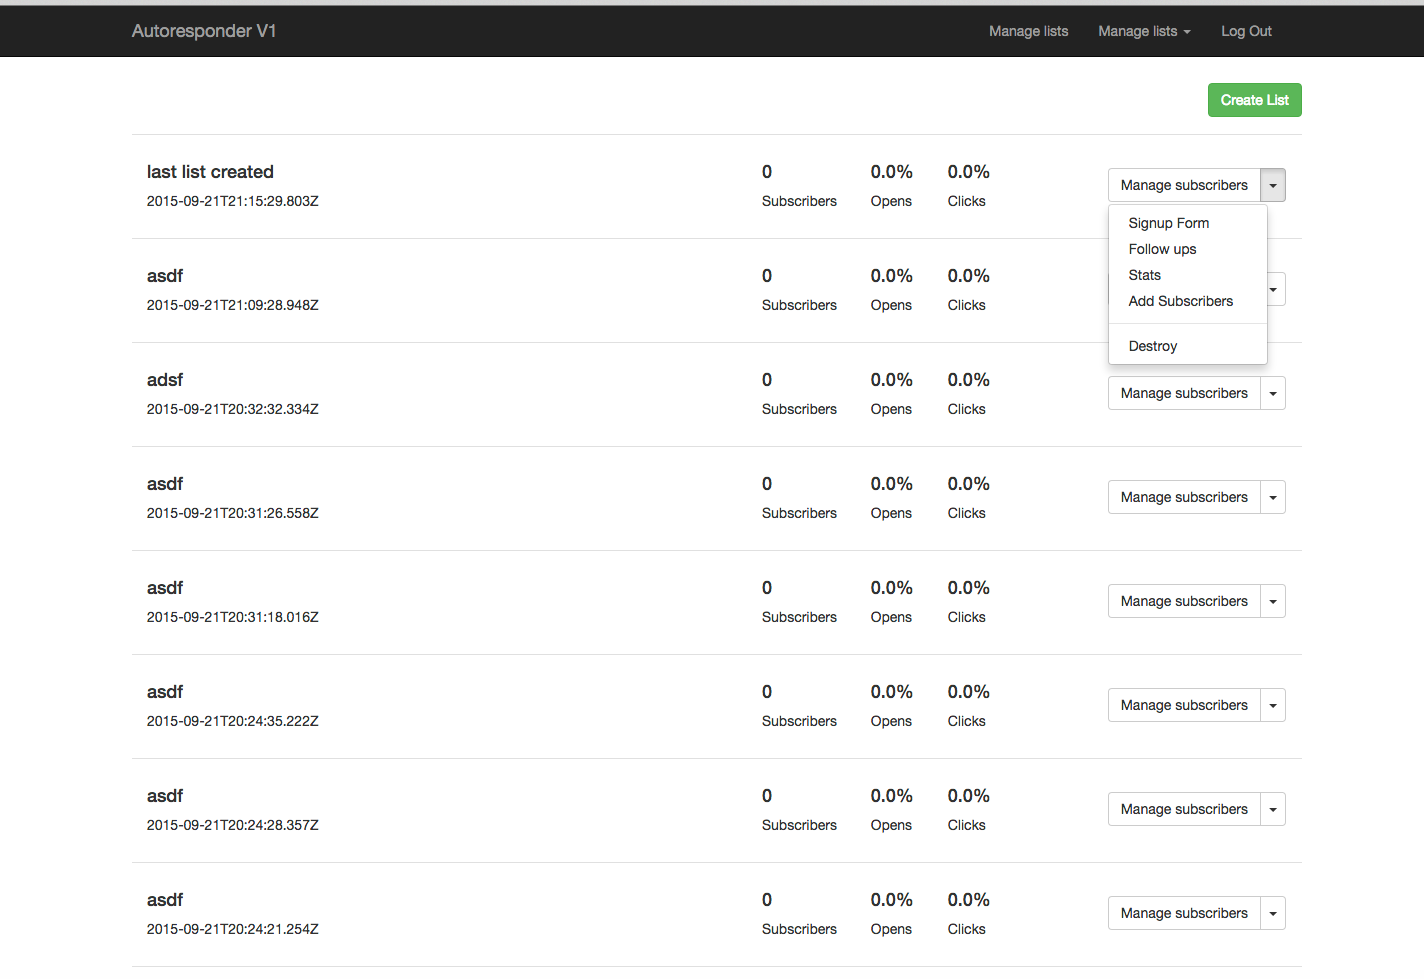
The template for listing email lists I came up with looks like:
# app/assets/javascripts/autoresponder/components/email_lists/index.html.haml
#email-lists
  .row
    %button{class: 'btn btn-success pull-right', 'ui-sref' => 'email_list.add'}
      Create List
  .row{class: 'span12', "ng-repeat" => "list in email_list"}
    .col-md-6
      %h4
        {{list.name}}
      %p {{list.created_at}}

    .col-md-3
      .data.inline-block{"aria-hidden" => "true"}
        %h4 0
        %p.dim-el Subscribers
      .data.inline-block{"aria-hidden" => "true"}
        %h4 0.0%
        %p.dim-el Opens
      .data.inline-block{"aria-hidden" => "true"}
        %h4 0.0%
        %p.dim-el Clicks

    .col-md-3.actions
      .btn-group
        %button.btn.btn-default{:type => "button",
                                'ui-sref' => 'email_list.details.subscribers({ emailListId: list.id })'} Manage subscribers
        %button.btn.btn-default.dropdown-toggle{"aria-expanded" => "false", "aria-haspopup" => "true", "data-toggle" => "dropdown", :type => "button"}
          %span.caret
          %span.sr-only Toggle Dropdown
        %ul.dropdown-menu
          %li
            %a{:href => "#", 'ui-sref' => 'email_list.details.signup_forms.settings({ emailListId: list.id })'} Signup Form
          %li
            %a{:href => "#", 'ui-sref' => 'email_list.details.follow_ups({ emailListId: list.id })'} Follow ups
          %li
            %a{:href => "#", 'ui-sref' => 'email_list.details.stats({ emailListId: list.id })'} Stats
          %li
            %a{:href => "#", 'ui-sref' => 'email_list.details.add_subscriber({ emailListId: list.id })'} Add Subscribers
          %li.divider{:role => "separator"}
          %li
            %a{:href => "#"} Destroy
Css styles
I’m organizating the styles in the following way:
# app/assets/stylesheets/application.css:
/*
 *= require 'bootstrap'
 *= require 'railsstrap'
 *= require 'fontawesome'
 *= require main
 */
# app/assets/stylesheets/main.scss:
@import 'modules/variables';
@import 'modules/email_lists';
# app/assets/stylesheets/modules/variables.scss
$black: black;
# app/assets/stylesheets/modules/email_lists.scss
#email-lists {
  .row {
    border-bottom: 1px solid #e0e0e0;
    padding: 17px 0;

    .data {
      padding-left: 30px;
    }

    .inline-block {
      display: inline-block;
    }

    .actions {
      text-align: right;
      font-size: 20px;
      padding: 16px;
    }
  }
}
This is how it looks so far:
Render notifications
For rendering notifications to the user I’m going to use growl provider, so let set it up:
We’ll need to add in the Gemfile within the rails-assets group the growl-2 gem:
gem 'rails-assets-angular-growl-2'
# bundle
and include this line in the manifiesto application.js file:
# this line goes before //= require autoresponder/app
//= require angular-growl-2
and additionally in your application.scss
*= require angular-growl-2
In order to use the growl provider, we need to add it as a dependency:
# app/assets/javascripts/autoresponder/app.js
var AutoresponderApp = angular.module('AutoresponderApp', [
  'templates',
  'ui.router',
  'angular-growl',
  'restangular',
]);
Include the directive somewhere in your html code. I’ve decided to include it in app/views/users/index.html.haml:
.container{"ng-app" => "AutoresponderApp"}
  %div{:growl => ""}
  %ui-view
If we want to set a global configuration for a service or provider, we can add it within the app.js file using AutoresponderApp.config(). For example, in my case I want to set up some global configurations for Growl, so the code I’ve added should look like:
// app/assets/javascripts/autoresponder/app.js
AutoresponderApp
  .config([
      'growlProvider',
      function (growlProvider) {
        growlProvider.globalReversedOrder(true);
        growlProvider.globalDisableIcons(true);
        growlProvider.globalTimeToLive(2000);
      }
  ]);
And then, we’ll create a service that will include Growl notification options, so that way if someday we decide to start using a different notification system, we just need to make some modifications in that service without the necessity to update all the places where we are using notifications. We’ll call it Render and the content for that looks something as follows:
# app/assets/javascripts/autoresponder/components/common/render.js
AutoresponderApp.factory('Render', [
  'growl',
  function(growl) {
    return {
      showGrowlNotification:  function (type, message) {
        var config = {};

        switch (type) {
          case "success":
            growl.success(message, config);
            break;
          case "info":
            growl.info(message, config);
            break;
          case "warning":
            growl.warning(message, config);
            break;
          default:
            growl.error(message, config);
        }
      }
    }
}]);
In order to use that service, we need to include the Render dependency in our controller and then we can invoke it in the following way:
Render.showGrowlNotification('warning', 'An error occurred while...');
Render.showGrowlNotification('success', 'The email list was created successfully');
Now, let’s add the functionality of creating a new email list
Let’s start with the controller emailListAddCtrl, the following content should be included in the file:
app/assets/javascripts/autoresponder/components/email_lists/emailListCtrl.js
  .controller('emailListAddCtrl', [
    '$scope',
    'EmailListService',
    'Render',
    '$state',
    function (
      $scope,
      EmailListService,
      Render,
      $state
    ) {

      $scope.email_list = {};

      $scope.createEmailList = function() {
        var _data;
        _data = {};

        _data.email_list = $scope.email_list;

        EmailListService.create(_data).then(function(email_list) {
          Render.showGrowlNotification('success', 'The email list was created successfully');
          return $state.go('email_list.details.form', { emailListId: list.id } );
        }, function(errorResponse) {
          return Render.showGrowlNotification('warning', 'An error occurred while creating the email list');
        });
      };
    }
  ])
There are a couple of things to talk about the code above:
We are using Render factory to show notifications depending on succesfull or failed scenarios, using $state provider if and email list is created successfully, we’ll redirect the user to the email list details where you can manage follow ups, manage subscribers, review some statistics, and so on.
As you’d expect, we have to declare the EmailListService.create method, so let’s do it:
# app/assets/javascripts/autoresponder/components/email_lists/emailListService.js
  create: function(params) {
    return Restangular.all(model).post(params);
 },
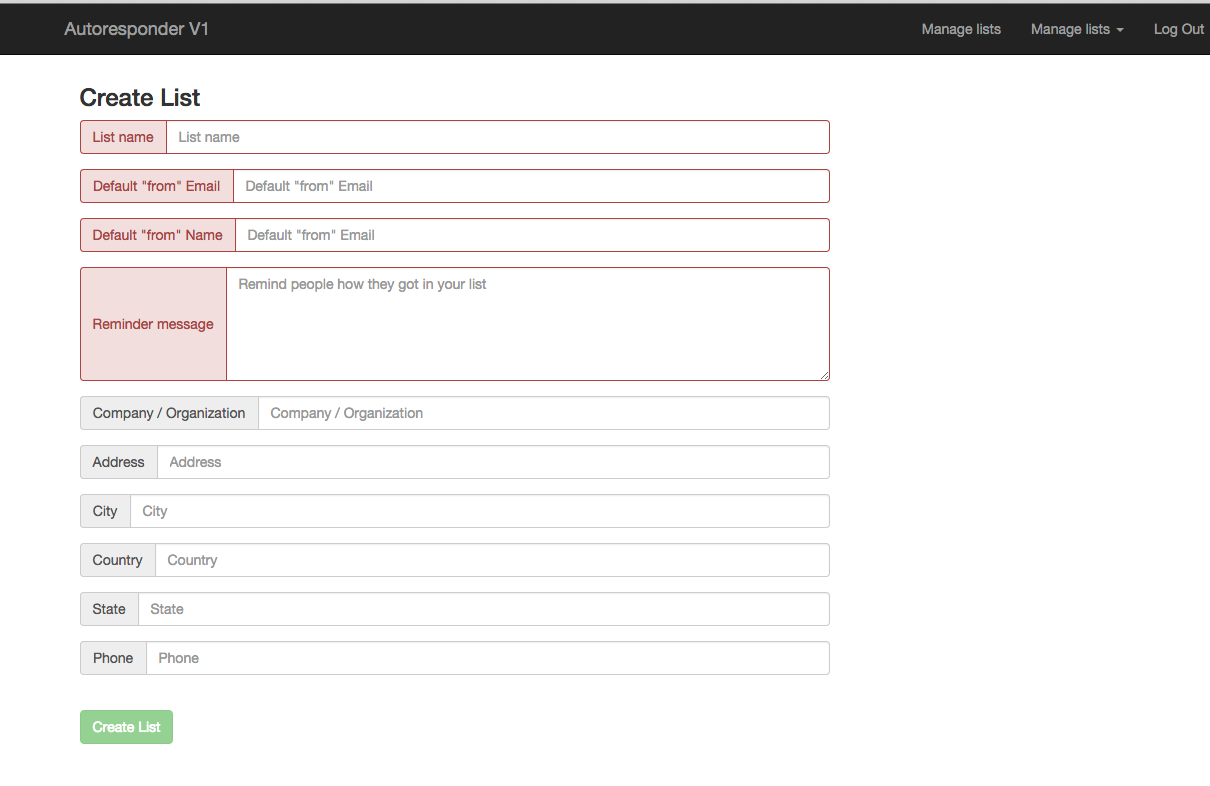
The template for creating new email lists includes Angular validation using pristine so that means that the submit button will be enable only when all the form elements are valid:
# app/assets/javascripts/autoresponder/components/email_lists/form_fields.html.haml
.input-group.form-group{'ng-class' => "{ 'has-error': EmailListForm.name.$invalid }"}
  %span.input-group-addon List name
  %input.form-control{ :name => "name",
                       'required' => 'required',
                       :placeholder => "List name",
                       'ng-model' => 'email_list.name',
                       :type => "text",
                       :value => ""}/

.input-group.form-group{'ng-class' => "{ 'has-error': EmailListForm.default_from.$invalid }"}
  %span.input-group-addon Default "from" Email
  %input.form-control{ :name => "default_from",
                       'required' => 'required',
                       :placeholder => 'Default "from" Email',
                       'ng-model' => 'email_list.default_from',
                       :type => "email",
                       :value => ""}/

.input-group.form-group{'ng-class' => "{ 'has-error': EmailListForm.default_from_name.$invalid }"}
  %span.input-group-addon Default "from" Name
  %input.form-control{ :name => "default_from_name",
                       'required' => 'required',
                       :placeholder => 'Default "from" Email',
                       'ng-model' => 'email_list.default_from_name',
                       :type => "text",
                       :value => ""}/

.input-group.form-group{'ng-class' => "{ 'has-error': EmailListForm.remind_people_message.$invalid }"}
  %span.input-group-addon Reminder message
  %textarea.form-control{ :name => "remind_people_message",
                          :rows => "5",
                          'required' => 'required',
                          :placeholder => 'Remind people how they got in your list',
                          'ng-model' => 'email_list.remind_people_message',
                          :type => "text",
                          :value => ""}

.input-group.form-group
  %span.input-group-addon Company / Organization
  %input.form-control{ :name => "company_organization",
                       :placeholder => 'Company / Organization',
                       'ng-model' => 'email_list.company_organization',
                       :type => "text",
                       :value => ""}/

.input-group.form-group
  %span.input-group-addon Address
  %input.form-control{ :name => "address",
                       :placeholder => 'Address',
                       'ng-model' => 'email_list.address',
                       :type => "text",
                       :value => ""}/

.input-group.form-group
  %span.input-group-addon City
  %input.form-control{ :name => "city",
                       :placeholder => 'City',
                       'ng-model' => 'email_list.city',
                       :type => "text",
                       :value => ""}/

.input-group.form-group
  %span.input-group-addon Country
  %input.form-control{ :name => "country",
                       :placeholder => 'Country',
                       'ng-model' => 'email_list.country',
                       :type => "text",
                       :value => ""}/

.input-group.form-group
  %span.input-group-addon State
  %input.form-control{ :name => "state",
                       :placeholder => 'State',
                       'ng-model' => 'email_list.state_province',
                       :type => "text",
                       :value => ""}/

.input-group.form-group
  %span.input-group-addon Phone
  %input.form-control{ :name => "phone",
                       :placeholder => 'Phone',
                       'ng-model' => 'email_list.phone',
                       :type => "text",
                       :value => ""}/
# app/assets/javascripts/autoresponder/components/email_lists/add.html.haml
%form.create-list-form{:name => "EmailListForm",
                         "ng-submit" => "createEmailList()",
                         :novalidate => ""}
  .row
    .col-md-6
      %h3 Create List

  .row
    .col-md-8
      %ng-include{:src => "'autoresponder/components/email_lists/form_fields.html'"}

  %br
  .row
    .col-md-6
      %button{ type:'submit',
               'ng-disabled' => "EmailListForm.$invalid",
               class: 'btn btn-success'}
        Create List
Let’s see how the email list form looks so far:
Email list details
This is what we are going to implement for email list details:
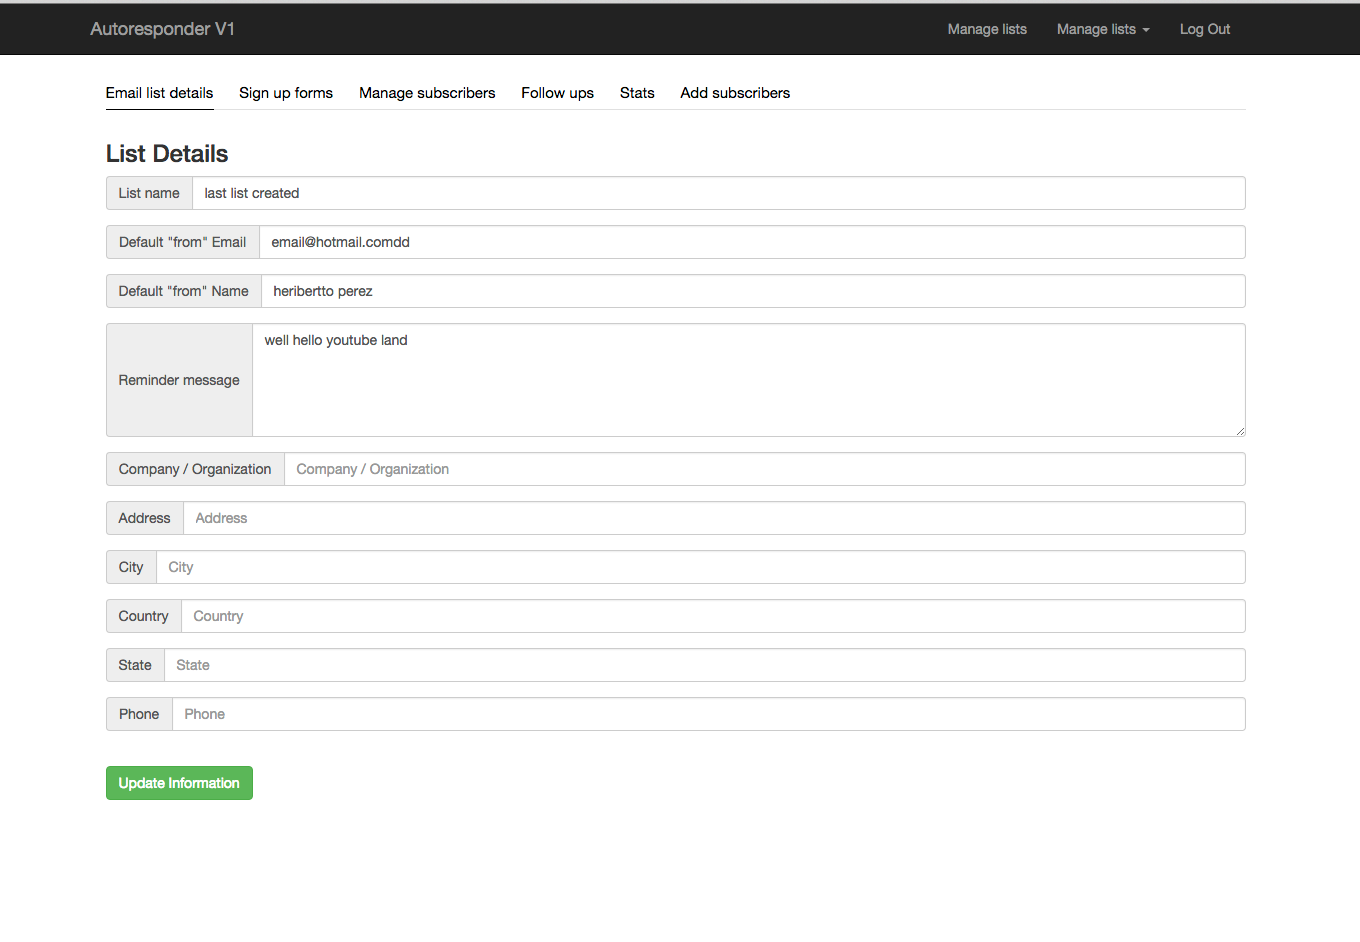
We are going to create nested routes for the different sections inside email list details, and they will look like a regular tab. Using $state.include is pretty straighforward to set as active those tabs, depending on which route we are at that point:
Let’s start declaring the routes:
open up app/assets/javascripts/autoresponder/states.js and include the following states:
        .state("email_list.details", {
          url: "/details/:emailListId",
          abstract: true,
          controller: 'emailListDetailsCtrl',
          templateUrl: 'autoresponder/components/email_lists/details/main.html',
          // if we want to share some information with our children
          // we can use resolve so that way if you need to use this variable from
          // children controller just add this dependency in your controller
          // for instance:
          //
          //.controller('emailListSignupFormCtrl', [
          //            'findCurrentEmailListInParent',
          //            function (
          //              findCurrentEmailListInParent,
          //)            {
          //               $scope.email_list = findCurrentEmailListInParent;


          resolve:{
            findCurrentEmailListInParent: ['EmailListService', '$stateParams', function (EmailListService, $stateParams) {
              var listId = $stateParams.emailListId;
              return EmailListService.findOne(listId);
            }]
          }
        })

        .state("email_list.details.form", {
          url: "",
          templateUrl: 'autoresponder/components/email_lists/details/form.html',
        })

        .state("email_list.details.subscribers", {
          url: "/subscribers",
          controller: 'emailListDetailsCtrl',
          templateUrl: 'autoresponder/components/email_lists/details/subscribers.html',
        })

        .state("email_list.details.follow_ups", {
          url: "/follow_ups",
          controller: 'emailListDetailsCtrl',
          templateUrl: 'autoresponder/components/email_lists/details/follow_ups.html',
        })

        .state("email_list.details.stats", {
          url: "/stats",
          //controller: 'emailListStatsCtrl',
          templateUrl: 'autoresponder/components/email_lists/details/stats.html',
        })

        .state("email_list.details.add_subscriber", {
          url: "/add_subscriber",
          //controller: 'emailListFollowUpsCtrl',
          templateUrl: 'autoresponder/components/email_lists/details/add_subscriber.html',
        })
We are using resolve because we want to access email_list details within children section and those routes are going to be available until the parent is resolved, so that way we can only make one request and we have access to email_list inside the children controller as well.
Inside the resolve method, we are using findOne method from EmailListService:
# app/assets/javascripts/autoresponder/components/email_lists/emailListService.js

  findOne: function(emailListId) {
    return Restangular.one(model, emailListId).get();
  },
Let’s create those templates to avoid 404 errors when visiting those routes(states):
# app/assets/javascripts/autoresponder/components/email_lists/details/main.html.haml
.email-list-details
  %ul.nav-menu
    %li{'ng-class' => "{ 'active': $state.includes('email_list.details.form') }"}
      %a{:href => "#", 'ui-sref' => 'email_list.details.form({ emailListId: email_list.id })'}
        Email list details

    %li{'ng-class' => "{ 'active': $state.includes('email_list.details.signup_forms') }"}
      %a{:href => "#", 'ui-sref' => 'email_list.details.signup_forms.settings({ emailListId: email_list.id })'}
        Sign up forms

    %li{'ng-class' => "{ 'active': $state.includes('email_list.details.subscribers') }"}
      %a{:href => "#", 'ui-sref' => 'email_list.details.subscribers({ emailListId: email_list.id })'}
        Manage subscribers

    %li{'ng-class' => "{ 'active': $state.includes('email_list.details.follow_ups') }"}
      %a{:href => "#", 'ui-sref' => 'email_list.details.follow_ups({ emailListId: email_list.id })'}
        Follow ups

    %li{'ng-class' => "{ 'active': $state.includes('email_list.details.stats') }"}
      %a{:href => "#", 'ui-sref' => 'email_list.details.stats({ emailListId: email_list.id })'}
        Stats

    %li{'ng-class' => "{ 'active': $state.includes('email_list.details.add_subscriber') }"}
      %a{:href => "#", 'ui-sref' => 'email_list.details.add_subscriber({ emailListId: email_list.id })'}
        Add subscribers

%ui-view
# app/assets/javascripts/autoresponder/components/email_lists/details/form.html.haml
%form.create-list-form{:name => "EmailListForm",
                         "ng-submit" => "updateEmailList()",
                         :novalidate => ""}
  .row
    .col-md-6
      %h3 List Details

  .row
    .col-md-12
      %ng-include{:src => "'autoresponder/components/email_lists/form_fields.html'"}

  %br
  .row
    .col-md-6
      %button{ type:'submit',
               'ng-disabled' => "EmailListForm.$invalid",
               class: 'btn btn-success'}
        Update Information
# app/assets/javascripts/autoresponder/components/email_lists/details/subscribers.html.haml
#h1
  subscribers
#  app/assets/javascripts/autoresponder/components/email_lists/details/signup_forms.html.haml
#h1
  Sign up forms
# app/assets/javascripts/autoresponder/components/email_lists/details/follow_ups.html.haml
#h1
  Follow ups
# app/assets/javascripts/autoresponder/components/email_lists/details/stats.html.haml
#h1
  Stats
#  app/assets/javascripts/autoresponder/components/email_lists/details/add_subscriber.html.haml
#h1
  Add Subscriber
Css styles you might want to use:
# app/assets/stylesheets/modules/email_lists.scss
.email-list-details {
  ul.nav-menu {

    border-bottom: 1px solid $corn_silk;
    margin-top: 18px;
    padding-bottom: 6px;
    padding-left: 0;

    .active {
      a {
        border-bottom: 1px solid $black;
        font-weight: 400;
        padding-bottom: 8px;
      }
    }

    li {
      display: inline-block;
      font-size: 15px;
      padding-right: 22px;

      a {
        color: $black;
        text-decoration: none !important;

        &:hover {
          border-bottom: 1px solid $black;
          font-weight: 400;
          padding-bottom: 8px;
        }
      }
    }
  }
}
# app/assets/stylesheets/modules/variables.scss
$corn_silk: #e0e0e0;
Email list details controller:
Notice how we are using findCurrentEmailListInParent within a child inside the controller.
  .controller('emailListDetailsCtrl', [
    '$scope',
    '$location',
    'findCurrentEmailListInParent',
    'EmailListService',
    'Render',
    function (
      $scope,
      $location,
      findCurrentEmailListInParent,
      EmailListService,
      Render
    ) {

      $scope.email_list = findCurrentEmailListInParent;

      $scope.updateEmailList = function() {
        var _data;
        _data = {};

        _data.email_list = $scope.email_list;

        EmailListService.update(_data, $scope.email_list.id).then(function(email_list) {
          Render.showGrowlNotification('success', 'The email list was updated successfully');
          return $scope.email_list = email_list;
        }, function(errorResponse) {
          return Render.showGrowlNotification('warning', 'An error occurred while creating the email list');
        });
      };
    }
  ])
As you see in the controller, we are using the following email service methods:
– EmailListService.update
So let’s include them in the EmailListService:
# app/assets/javascripts/autoresponder/components/email_lists/emailListService.js
AutoresponderApp
  .factory('EmailListService', ['Restangular',
                            function(
                              Restangular
                            ) {
    var model;

    model = 'api/v1/email_lists';

    return {
      findAll: function(params) {
        return Restangular.all(model).getList(params);
      },

      create: function(params) {
        return Restangular.all(model).post(params);
      },

      findOne: function(emailListId) {
        return Restangular.one(model, emailListId).get();
      },

      update: function(params, emailListId) {
        return Restangular.one(model, emailListId).customPUT(params);
      },
    };
  }
]);
You can use this pull request as a reference that includes all the code added and all the changes included in this part:
https://github.com/heridev/MailAssemble/pull/2
So, that’s it for the second part, wait for the next one where we’ll create dynamic signup forms which you can insert in your website to add subscribers to your list, keep in touch and let me know if you have any comments.
H.

