Next.js has become popular in the last years but why developers love it? Next.js is a framework built on top of React. It makes server-side rendering possible without any complex configuration. It also offers several out-of-the-box features which help developers to be faster and more effective. It has a fast learning curve which makes it easy for less experienced developers to implement its amazing features.
Before we get started, let us tell you a little bit about Next.js, and what we can do with this framework.
What is Next.js?

Next.js is a flexible React framework which gives you building blocks to create fast web applications.
But, what do we exactly mean by this? Let’s spend some time expanding on what React and Next.js are and how they can help us
How To Install Next.js in Our React Project?
Next.js recommends using create-next-app, which sets up everything automatically for you. To create a project run:
npx create-next-app@latest
# or
yarn create next-app
# or
pnpm create next-app
If you want to start with a TypeScript project you can use the --typescript flag:
npx create-next-app@latest --typescript
# or
yarn create next-app --typescript
# or
pnpm create next-app --typescript
You could find more information about it here:
Getting Started | Next.js
Building Blocks of a Web Application
There are a few things you need to consider when building modern application, such as:
- User Interface – how users will consume and interact with your application.
- Routing – how users navigate through different parts of your application.
- Data Fetching – where your data lives and how you can get it.
- Rendering – when and where you render static or dynamic content are.
- Integrations – what third-party services you use (CMS, auth, payments, etc) and how you connect to them.
- Infrastructure – where you deploy, store, and run your application code (Serverless, CDN, Edge, etc).
- Performance – how to optimize your application for end-users.
- Scalability – how your application adapts to your team, data, and traffic grow.
- Developer Experience – your team’s experience building and maintaining your application
For each part of your application, you will need to decide whether you will build a solution yourself or use other tools, such as libraries and frameworks.

But what is the thing that makes Next such a great framework? Let’s talk about the rendering.
Routing in NextJs
The Next.js router allows you to do client-side route transitions among pages, similar to a single-page application.
A React component called Link is provided to do this client-side route transition.
import Link from 'next/link'
function Home() {
return (
-
Home
-
About Us
-
Blog Post
)
}
export default HomeThe example above uses multiple links. Each one maps a path (href) to a known page:
/→pages/index.js/about→pages/about.js/blog/hello-world→pages/blog/[slug].js
In order to have more information about how the routing works in NextJs, go here: Routing: Introduction | Next.js
Difference With Routing in React
In order to implement the routing in React we have to install a library.
You can install React Router from the public npm registry with either npm or yarn . Since we are building a web app, we will use react-router-dom in this guide.
yarn add react-router-dom
Next, copy/paste these examples into src/App.js.
In this example we have 3 “pages” handled by the router: a home page, an about page, and a users page. As you click around on the differences, the router renders the matching .
Note: Behind the scenes a renders an with a real href, so people using the keyboard for navigation or screen readers will still be able to use this app.
import React from "react";
import {
BrowserRouter as Router,
Switch,
Route,
Link
} from "react-router-dom";
export default function App() {
return (
{/* A looks through its children s and
renders the first one that matches the current URL. */}
);
}
function Home() {
return Home
;
}
function About() {
return About
;
}
function Users() {
return Users
;
}As it can be seen in these examples, Next implements routing as one of its functionalities, which makes it much easier for both static and dynamic routes, while in React it is necessary to install external libraries to have this same operation.
What is Rendering?
Rendering is a process used in web development that turns website code into the interactive pages users see when they visit a website. The term generally refers to the use of HTML, CSS, and JavaScript codes. The process is completed by a rendering engine, the software used by a web browser to render a web page. Because of its close association with web browsers, rendering engines are commonly referred to as browser engines.
Client Side Rendering
When you create React apps using only React or the CLI command create-react-app, you are building an application that has a basic HTML file that calls one or more JavaScript files. That JavaScript creates and loads all of your HTML into the site by injecting it into the document object model dynamically. This all happens on the client side.
It is important to note that the client CPU does all the processing of the JavaScript when applications are using client-side rendering. Normally, this will not be too intense, and most computers should be able to handle it. The site should load pretty quickly. In some cases, like on old computers with slow processors, you would see that having the client handle the processing is not ideal.

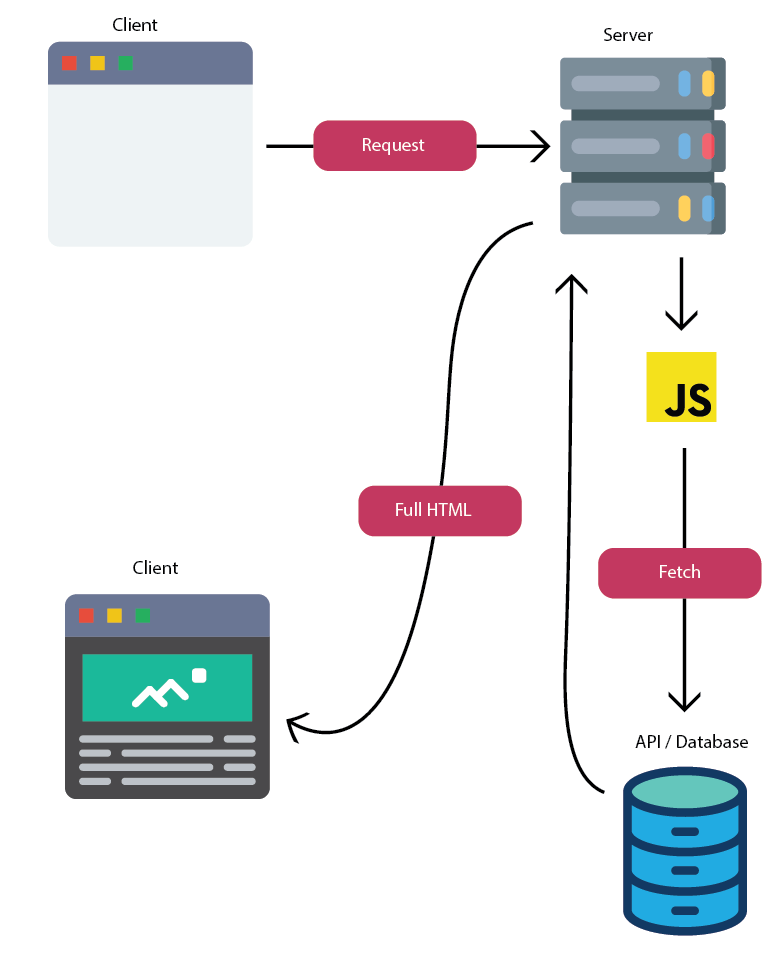
Server-Side Rendering with Next.js
When applications are using server-side rendering, the client receives a full HTML document. The server will access all the required data and run the JavaScript. It creates the page and sends it in its entirety back to the client.
The server will access APIs, loop through the data, and anything else you want it to do. One benefit you get with this is that servers are extremely fast. It can do this work much faster than a client’s computer. They also have a better connection to the internet, which helps the speed in which APIs can reply much faster.
This is really important too. What if you get an entire document back from the server but then need your app to make an additional call to an API to get data? You can do this with Next.js. You are not forced to render everything on the server. You will still be able to make asynchronous requests to APIs and update the document without a page refresh.
What About the Speed?
Servers can process JavaScript and create documents faster than a client. The main difference is that you will see the browser waiting for a response from the server a little longer with server-side rendering, since all the work is done on the server. Once the response comes, the site loads instantly and all at once. This still takes less time than the often speedier initial response when using client-side rendering. When you handle it this way, things start loading on the page asynchronously and take a second or two to fully complete.
Next.js builds the HTML page at build time and serves the pre-rendered page from server to browser with minimal JavaScript code and when page is loaded by browser, its JavaScript code runs and makes the page fully interactive. (This process is called Hydration)
What Are The Benefits of Server-Side Rendering?
There will always be pros and cons for all of the rendering options. It is up to the SEO and engineering teams to review these and decide which path is the best based on resources. From a search engine perspective, server-side rendering is the second-best option for rendering JS. The biggest benefit is the rate at which pages can be rendered. The faster search engines can “view" your pages, the faster it can move on to the next page and improve your crawl budget. Not only does your crawl budget improve, but your user experience also increases.
Another benefit of SSR is that you can ensure all of your page elements are rendering. When you rely on a browser, you are reliant upon their technology. An older machine that may not be able to process large resources could result in partial rendering. This means crucial content elements or information might be missing, and Google cannot give you “credit” for those elements. This creates a bad UX. It may also impact search engines’ ability to rank pages that were missing important information.