I have heard from many successfull Internet marketers one of the most important online proverbs which says “The Money is in the List”. Many bussinesses that have started focusing more on building lists have revealed that the email list is indeed a powerful tool.
There are numerous “Email list – building tactics” all over the internet that promise gazillions of subscribers with little effort, but this post is not about what the best strategies to build your email list are, is about one of the most important tools when building your list: Autoresponders.
Autoresponders and email marketing in general are essential for your business. You use it to follow-up with customers, build loyalty, make sales and keep people coming back to your site.
In this set of tutorials we are going to create our own Single Page Application Autoresponder which uses authentication and permission roles with Devise and CanCanCan using Rails 4.2 and Angular.js 1.4, and the best part, it will never reload/refresh.
As you know, there are different ways to setup your project and you might have some preferred ways to manage assets, libraries, utilities, rainbows and dependencies that you want to use; with that in mind, I would suggest you to use one of my preferred ways to manage assets. Some of them are bellow:
– Bower: A package manager for the web.
– Rails-Assets.org: The solution to assets management in Rails.
For this ocassion, we are going to use Rails-Assets.org, but if you want to take a deep dive into the different ways to manage your assets you can look at this post:
http://www.codefellows.org/blog/5-ways-to-manage-front-end-assets-in-rails.
Aditionally, there are some of the technologies, gems, javascript libraries that we are going to use and include:
- Rails 4.2
- Angular.js 1.4
- Rails assets as an asset manager instead of Bower.
- ActiveRecord Serializers.
- Devise.
- CanCanCan.
- InfiniteScroll directive.
- MultiJson.
- Boostrap sass
- Rails angular templates.
- and more …
Let’s get right to create our rails app from scratch!
First thing first: Let’s generate our new Rails application:
# install the lastest rails version
gem install rails -v 4.2
rails new spa-angular-rails
Make sure that in your Gemfile you have the latest stable rails version, something as follow:
gem 'rails', '4.2.4'
Let’s add authentication to our application:
## In your Gemfile
gem 'devise'
We need to install “Devise” in our application. To do that, remember to configure your db correctly by default using sqlite:
rails generate devise:install
let’s create the model. Let’s call it User:
rails generate devise User
Now we are going to generate the views:
rails g devise:views
Don’t forget to run the new migrations added by “Devise”:
rake db:migrate
with the aim of adding some views, let’s create a controller:
rails g controller users
Open up the file in app/controllers/users_controller.rb and add an empty method:
class UsersController < ApplicationController
  before_filter :authenticate_user!
  def index;end
end
We are going to use Haml, so please add the haml gem:
gem 'haml'
Add an index haml view for index which will be the only view in rails that will load our Single Page Application in Angular. In my case, I’ll call my application AutoresponderApp, but you can select whichever name you prefer:
# app/views/users/index.html.haml
.container{"ng-app" => "AutoresponderApp"}
  %ui-view
In order to avoid problems with local configurations for the emails with “Devise”, let’s setup our development environment, let’s add the code as follow to the existent file:
#config/environments/development.rb
  config.action_mailer.default_url_options = {
    host: 'localhost:3000'
  }
Now, it is time for the config/routes.rb edition:
What we are going to do here is just adding the route for the root page; and our file should look something like:
RailsAngularWithRailsAssets::Application.routes.draw do
  devise_for :users
  root to: 'users#index'
end
I will not use turbolinks and you won’t either, so let’s remove the turbolinks from the Gemfile and the application.js as well.
#app/assets/javascripts/application.js
# remove this line
//= require turbolinks
Now, let’s run our web server and take a look at the messages we just added:
rails server
## visit the page http://localhost:3000
Let’s setup the angular workspace:
the first thing we are going to do is to add the angular library to our application. In this project, we’re going to use rails assets for managing the assets dependencies https://rails-assets.org/, so lets get right to it:
gem 'bundler', '>= 1.8.4'
gem 'angular-rails-templates'

source 'https://rails-assets.org' do
  gem 'rails-assets-angular'
  gem 'rails-assets-angular-ui-router'
  gem 'rails-assets-restangular'
  gem 'rails-assets-underscore'
end

# I tried to put this in assets group
# but it does not work for that reason
# this libraries are here :(
gem 'less-rails'
gem 'railsstrap'
After adding these new dependencies, do not forget to install them using:
bundle install
We are using for this project boostrap styles, and we have added bundler because it is required to use rails assets and the instructions are available at the official website: https://rails-assets.org/
Instead of using Angular $http is preferable to use Restangular.
We are using angular-rails-templates for the templates management, so you can use different kind of templates, for example:
foo.html
foo.html.erb
foo.html.haml
foo.html.slim
For this tutorial we are using Haml.
If we added our gems correctly, now it is time to include those libraries in the application.js file:
//= require jquery
//= require jquery_ujs

//= require bootstrap/dist/js/bootstrap
//= require angular
//= require angular-ui-router
//= require underscore
//= require restangular/restangular
//= require angular-rails-templates

//= require autoresponder/app
//= require autoresponder/states
We are going to create a folder called ‘autoresponder’ where we’ll put all the angular, templates and javascript code. The main file is called ‘app.js’.
So let’s declare the Angular namespace where we can put the dependencies we want to use, let’s code it in our app.js file:
"use strict";
var AutoresponderApp = angular.module('AutoresponderApp', [
  'templates',
  'ui.router',
  'restangular',
]);

/* Run Block */
AutoresponderApp.run(
  [ '$rootScope', '$state', '$stateParams',
    function ($rootScope, $state, $stateParams) {
      //we this code added you can check on your
      // templates if you are for example in a specific route
      // and set as active that option for example
      // $state.include('route.nested')
      $rootScope.$state = $state;
      // we want to have access to the params
      // without adding stateparams in our
      // controller again
      $rootScope.$stateParams = $stateParams;
      $rootScope.appVer = 'v1';
    }
]
);
It’s time to implement the basic routes for our application. By the way, we are using ui-router; to do that, let’s create a file called “states.js” with the following content:
/* app/assets/javascripts/autoresponder/states.js /*
/* States */
AutoresponderApp
.config(['$stateProvider', '$urlRouterProvider', '$httpProvider',
function ($stateProvider, $urlRouterProvider, $httpProvider) {
// Use $urlRouterProvider to configure any redirects (when) and invalid urls (otherwise).
$urlRouterProvider
.when('/home', '/')
.otherwise('/');
// State Configurations
$stateProvider
.state("home", {
url: "/",
template: 'Welcome to our new autoresponder
',
})
}
]);
We are using less-rails and railstrap; for this reason, we are going to add boostrap to our project using the generator:
rails generate railsstrap:install less
Now, we’ll add the basic jumbotron boostrap layout for our main application.html.erb layout, but first let’s rename it in order to use haml:
# before
app/views/layouts/application.html.erb
# after
app/views/layouts/application.html.haml
Now we can use the following content:
!!!
/[if lt IE 7]
/[if IE 7]
/[if IE 8]
/ [if gt IE 8]> ""}
  /  "utf-8"}/
    %meta{:content => "IE=edge,chrome=1", "http-equiv" => "X-UA-Compatible"}/
    %title
    %meta{:content => "", :name => "description"}/
    %meta{:content => "width=device-width, initial-scale=1", :name => "viewport"}/
    %link{:href => "apple-touch-icon.png", :rel => "apple-touch-icon"}/
    = stylesheet_link_tag    "application", media: "all", "data-turbolinks-track" => true
    = javascript_include_tag "application", "data-turbolinks-track" => true
    = csrf_meta_tags
  %body
    /[if lt IE 8]
      You are using an outdated browser. Please upgrade your browser to improve your experience.
    .navbar.navbar-inverse.navbar-custom.navbar-fixed-top{:role => "navigation"}
      .container
        .navbar-header
          %button.navbar-toggle{"data-target" => ".navbar-collapse", "data-toggle" => "collapse", :type => "button"}
            %span.sr-only Toggle navigation
            %span.icon-bar
            %span.icon-bar
            %span.icon-bar
          %a.navbar-brand{:href => "#"} My App
        #main-menu.collapse.navbar-collapse
          %ul.nav.navbar-nav.navbar-right
            %li
              %a{:href => "#option-1"} Option 1
            %li.dropdown
              %a.dropdown-toggle{"data-toggle" => "dropdown", :href => "#"}
                Main Option 2
                %b.caret
              %ul.dropdown-menu
                %li
                  %a{:href => "#option-2"} Option 2
                %li
                  %a{:href => "#option-3"} Option 3
            %li
              %a{:href => "#logout"} Log Out
        / /.nav-collapse
    .container{:style => "padding-top: 60px"}
      = yield
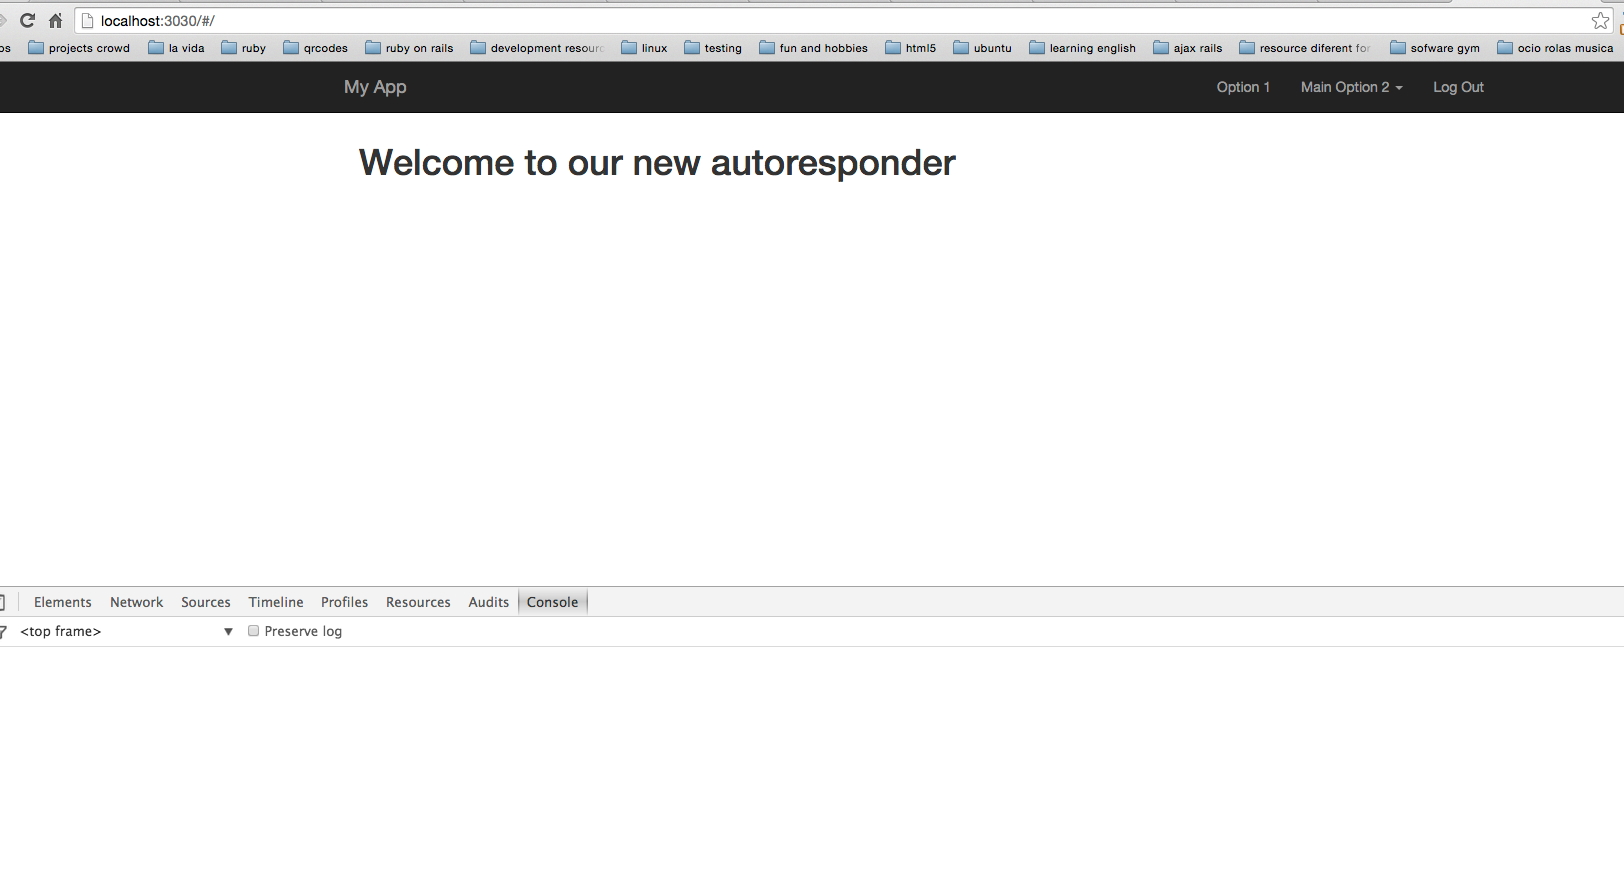
At this point, if we run our server:
rails server
we should see something like this after signing up:
you can check out the code example in the following repository:
https://github.com/heridev/spa-autoresponder-angular-rails/tree/feature/implementation-part-1
Well, this is all for the first introductory part about creating our own Autoresponder. Wait for the second part the next week 🙂
Hope you learned with this post, see you next time.
H.